Most American homeowners in the Dallas-Fort Worth area know storms can wreak havoc fast, leaving bathrooms in urgent need of expert attention. When water intrusion and hidden hazards threaten your space, swift and smart action is critical. This guide highlights proven steps and expert insights to help you safely assess damage, prep for restoration, and choose durable upgrades—so your bathroom is built back stronger and ready for the next Texas storm.
Table of Contents
- Step 1: Assess Storm Damage And Identify Hazards
- Step 2: Clear Debris And Prep The Bathroom
- Step 3: Repair Structural And Plumbing Issues
- Step 4: Upgrade Features And Install New Fixtures
- Step 5: Verify Quality And Ensure Proper Function
Quick Summary
| Key Insight | Explanation |
|---|---|
| 1. Prioritize Safety First | Always ensure personal safety during damage assessment and avoid further risks by contacting professionals if needed. |
| 2. Document Everything | Take clear photographs and detailed notes of damages for insurance claims and assessments to support your restoration. |
| 3. Clear Debris Effectively | Remove all damaged materials with protective gear and disinfect surfaces to create a clean workspace for repairs. |
| 4. Inspect Structures Thoroughly | Check walls, floors, and plumbing for hidden damage; consult professionals for complex repairs to avoid long-term issues. |
| 5. Upgrade for Resilience | Choose water-efficient and moisture-resistant materials during renovations to prevent future storm damage and improve functionality. |
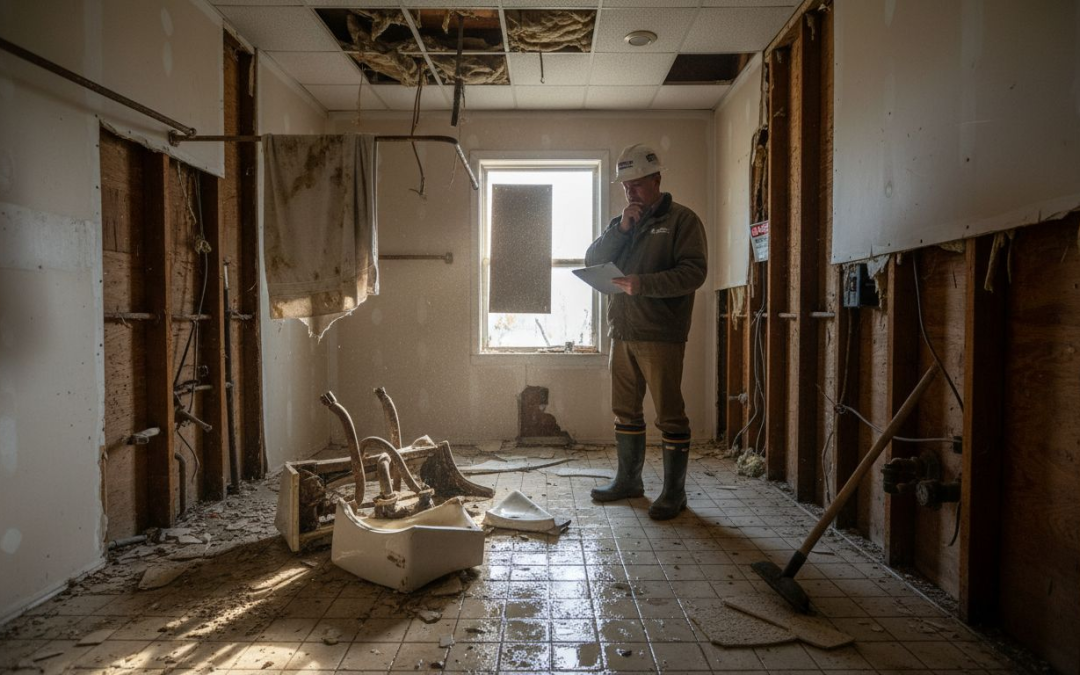
Step 1: Assess Storm Damage and Identify Hazards
After a severe storm ravages your bathroom, your first priority is conducting a comprehensive damage assessment that ensures your safety and prevents further destruction. Knowing how to systematically inspect your space can make the difference between a quick repair and extensive renovation.
Begin by performing a careful preliminary damage assessment that focuses on identifying potential hazards. Look for immediate warning signs such as water intrusion, structural damage, exposed electrical wiring, and potential mold growth. Check your walls for cracks, inspect the flooring for warping or water damage, and examine the ceiling for signs of leaks or potential structural compromise. Pay special attention to electrical outlets and fixtures near water sources, as these can pose significant safety risks.
Prioritize personal safety during this initial inspection. If you notice significant structural damage, exposed electrical components, or extensive water intrusion, do not attempt to investigate further. Instead, contact professional restoration experts who can safely evaluate and address the damage. Document everything you observe with clear photographs and detailed notes, which will be crucial for insurance claims and professional repair assessments.
Pro Tip: Always wear protective gear like rubber boots, gloves, and a respirator when initially assessing storm damage to protect yourself from potential hazards.
Here’s a summary of common hazards identified during post-storm bathroom assessments:
| Hazard Type | Typical Signs | Potential Risks |
|---|---|---|
| Water Intrusion | Wet walls, warped flooring | Mold, structural decay |
| Structural Damage | Cracks, sagging ceilings | Collapse risk, injury potential |
| Electrical Exposures | Exposed wires near water | Shock, fire hazard |
| Mold Growth | Musty odor, discoloration | Respiratory issues, spread |
Step 2: Clear Debris and Prep the Bathroom
After assessing the storm damage, your next critical task is systematically clearing debris and preparing your bathroom for restoration. This step involves careful removal of damaged materials and creating a clean workspace for potential repairs or complete renovation.
Begin by removing damaged materials and controlling potential contaminant spread. Start with larger debris like broken tiles, damaged drywall, and waterlogged fixtures. Wear protective gear including heavy gloves, safety glasses, and a respirator to protect against mold spores and potentially hazardous materials. Carefully bag and dispose of wet materials to prevent further moisture damage or mold growth. Pay special attention to areas behind walls, under flooring, and around fixtures where water might have accumulated and caused hidden damage.
Thoroughly clean and disinfect all remaining surfaces using specialized cleaning solutions designed for post water damage restoration. Use industrial fans and dehumidifiers to accelerate the drying process, ensuring you remove all moisture that could lead to future mold or structural problems. Document your debris removal process with photographs for insurance purposes and professional restoration teams who might need a comprehensive overview of the initial damage.
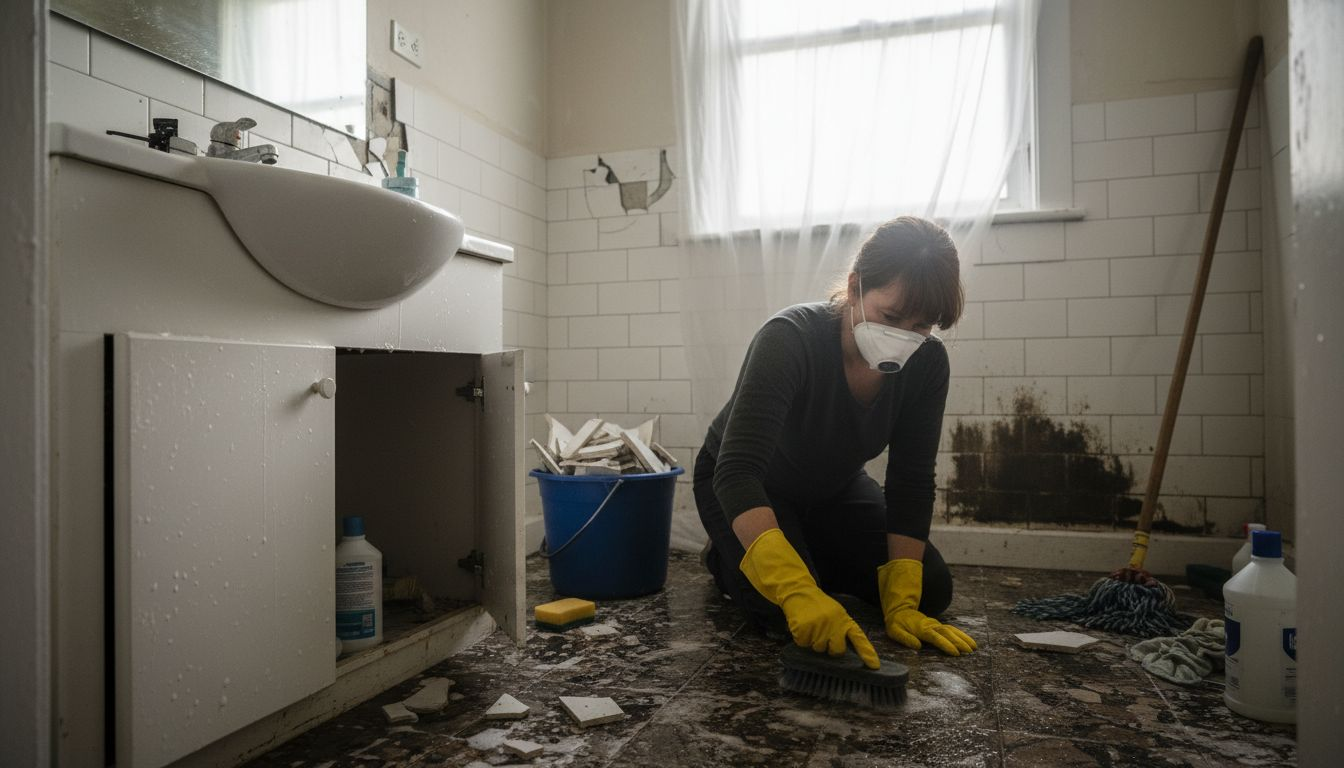
Pro Tip: Create a staging area outside the bathroom for sorted materials to streamline your cleanup process and prevent cross contamination.
Step 3: Repair Structural and Plumbing Issues
Addressing storm damage in your bathroom requires a systematic approach to structural and plumbing repairs. Your goal is to restore the integrity of your space while preventing future water damage and potential safety hazards.
Begin by comprehensively inspecting structural components and plumbing systems for storm induced damage. Check the bathroom walls for signs of water damage, such as soft spots, discoloration, or warping that could indicate compromised structural integrity. Examine floor joists and subfloors for water saturation or potential wood rot. For plumbing systems, carefully inspect pipes for cracks, leaks, or shifts caused by storm pressure. Look for signs of water damage around pipe connections, toilet bases, and sink fixtures. Any visible corrosion, unexpected moisture, or structural weakness requires immediate professional evaluation.
Consult a professional contractor to assess complex structural repairs or plumbing issues beyond basic visual inspection. Some damage might not be immediately apparent and could lead to long term problems if not properly addressed. Professional experts can use specialized moisture detection equipment and thermal imaging to identify hidden water damage that could compromise your bathroom’s structural integrity. Prioritize repairs that prevent further water intrusion and potential mold growth, which can cause significant health risks and additional renovation expenses.
Pro Tip: Take detailed photographs of all damage before repairs to support insurance claims and provide a clear record for restoration professionals.
Step 4: Upgrade Features and Install New Fixtures
Transforming your storm damaged bathroom into a more resilient and functional space presents an exciting opportunity to modernize and improve your home. This step focuses on selecting and installing upgraded features that will enhance both the aesthetic and practical aspects of your bathroom.
Consider implementing hazard informed design principles that improve bathroom resilience and sustainability. Select water efficient fixtures like low flow toilets and showerheads that reduce water consumption while providing excellent performance. Choose moisture resistant materials such as porcelain tiles, solid surface countertops, and waterproof wall panels that can withstand potential future water exposure. Focus on durable components that offer enhanced protection against humidity and potential storm damage. Consider installing improved ventilation systems with humidity sensors and high efficiency exhaust fans to prevent mold growth and maintain optimal air quality.
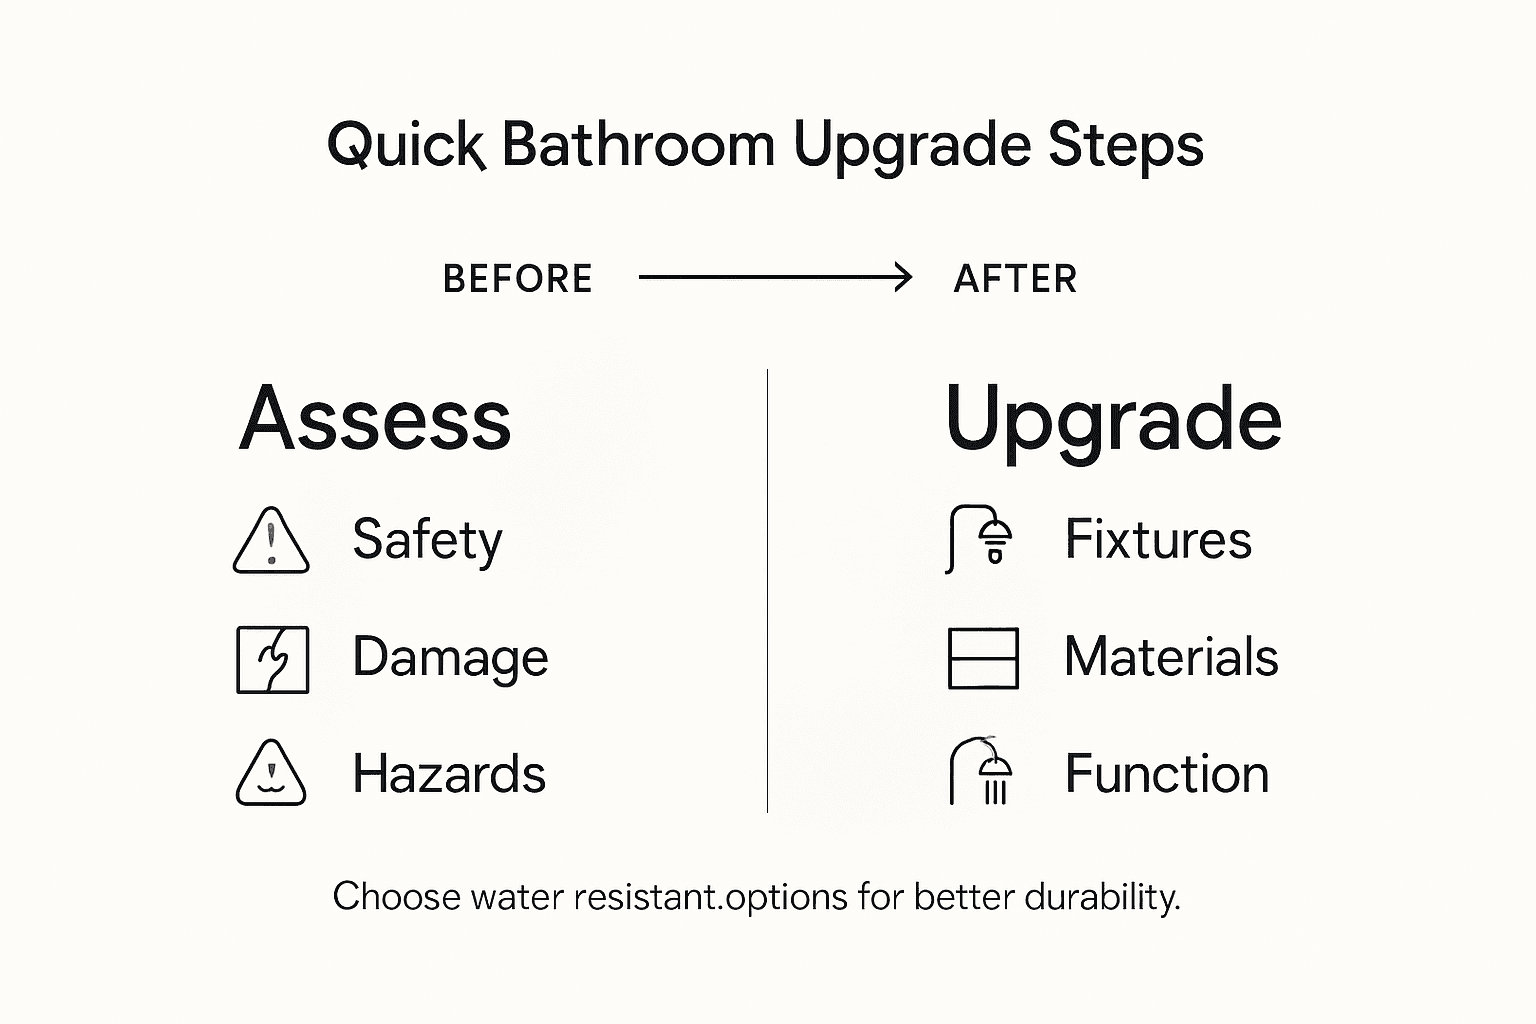
Work with a professional contractor to ensure proper installation of new fixtures and materials. Professional installation guarantees that waterproofing techniques are correctly applied and that new components meet local building codes. Pay special attention to sealing connections, using water resistant grout, and creating proper drainage slopes that direct water away from vulnerable areas. This comprehensive approach not only upgrades your bathroom but also creates a more resilient space that can better withstand potential future environmental challenges.
Pro Tip: Select fixtures with warranties that specifically cover water damage to provide additional peace of mind for your renovation investment.
Compare these popular moisture-resistant bathroom upgrade options:
| Material/Fixture | Key Benefit | Maintenance Needs |
|---|---|---|
| Porcelain Tiles | Highly water-resistant | Occasional sealing |
| Solid Surface Countertop | No seams for leaks | Simple cleaning |
| Waterproof Wall Panels | Long-lasting durability | Rare replacement |
| Low Flow Showerhead | Reduces water consumption | Regular filter checks |
Step 5: Verify Quality and Ensure Proper Function
The final stage of your bathroom restoration demands meticulous verification to guarantee safety, functionality, and long term performance. This critical step transforms your renovation from a repair project to a comprehensive quality assurance process that protects your investment.
Conduct a systematic quality assessment following storm damage repairs to confirm all installations meet safety standards and building codes. Begin with comprehensive leak testing by running water through all fixtures and carefully inspecting connection points for any signs of water seepage. Check drainage systems by observing water flow rates and ensuring no standing water occurs in shower areas or around toilet bases. Test electrical components like ventilation fans, lighting, and outlets to confirm proper grounding and functionality. Pay special attention to newly installed waterproofing materials, examining seals around shower enclosures, sink bases, and wall junctions for potential vulnerability.
Enlist a professional inspector or contractor to perform a final comprehensive evaluation. These experts can use specialized moisture detection equipment and thermal imaging to identify potential hidden issues that might not be immediately visible. Their thorough assessment will provide additional peace of mind and validate that your bathroom restoration meets all local building regulations and safety requirements. Document this final inspection carefully, maintaining records for insurance purposes and future reference.
Pro Tip: Request a written inspection report with detailed findings to create a permanent record of your bathroom restoration quality.
Restore Your Bathroom with Expert Storm Damage Repair and Remodeling
Severe storms can leave your bathroom damaged and unsafe, causing issues like water intrusion, structural damage, and plumbing problems that require swift, professional attention. If you have noticed cracked walls, warped floors, or mold growth after a storm, you need reliable solutions that combine thorough damage assessment, quality repairs, and smart upgrades to protect your home and enhance comfort.
At Astrotech Construction, we specialize in comprehensive bathroom remodeling and storm damage repair across the Dallas Fort Worth Metroplex. Our team handles everything from clearing debris and structural fixes to installing moisture resistant fixtures and verifying quality to bring your bathroom back to life swiftly and safely. Whether you want to restore your space or upgrade it with modern, water-efficient designs, our expertise ensures lasting results you can trust.
Don’t let storm damage linger and worsen. Take control of your bathroom restoration today by scheduling a consultation with us. Visit Astrotech Construction now to start your transformation. Experience top-tier service that protects your home and elevates your living space with precision and care.
Frequently Asked Questions
What steps should I take to assess storm damage in my bathroom?
Begin by inspecting for water intrusion, structural damage, and any exposed electrical wiring. Ensure you document your findings with photographs for insurance purposes and to assist restoration professionals.
How do I clear debris after a storm in my bathroom?
Start by wearing protective gear and carefully removing all damaged materials, such as tiles and drywall. Create a staging area outside the bathroom to sort and temporarily store these items for proper disposal.
What are common plumbing issues to look for after storm damage?
Inspect all plumbing systems for cracks, leaks, or shifts caused by the storm’s pressure. Focus on pipe connections, toilet bases, and any fixtures that may have been compromised to prevent future water damage.
How can I upgrade my bathroom to prevent future storm damage?
Select moisture-resistant materials and water-efficient fixtures for your remodel. Implement improved ventilation systems to help maintain air quality and reduce humidity levels.
What should I do to verify the quality of my bathroom restoration?
Conduct a thorough inspection of all installations, checking for leaks and ensuring components meet safety standards. Enlist a professional inspector to perform a final evaluation and document their findings for future reference.
How can I prepare for mold growth after a storm in my bathroom?
Ensure thorough disinfection of all surfaces and use industrial fans and dehumidifiers to dry the space completely. Maintain optimal airflow and humidity levels by installing efficient exhaust fans to further prevent mold growth.
Recommended
- Why Renovate After Damage: Safety, Value, and Recovery – Astrotech Construction
- 7 Essential Types of Remodeling Services for Homeowners – Astrotech Construction
- 7 Key Advantages of Bathroom Remodeling for Homeowners – Astrotech Construction
- Bathroom remodeling Colleyville Southlake Trophy Club Bedford TX
- How to Clean After Renovation in McKinney: 2025 Guide