Intense storms and unpredictable weather across Dallas-Fort Worth can quickly leave homeowners dealing with battered or failing siding. Addressing weather damage goes beyond curb appeal—it is about protecting your home from future moisture and structural problems. This step-by-step guide covers every stage, from thorough visual inspection to final touches, so you can tackle siding replacement with confidence and achieve a result that stands up to North Texas conditions.
Table of Contents
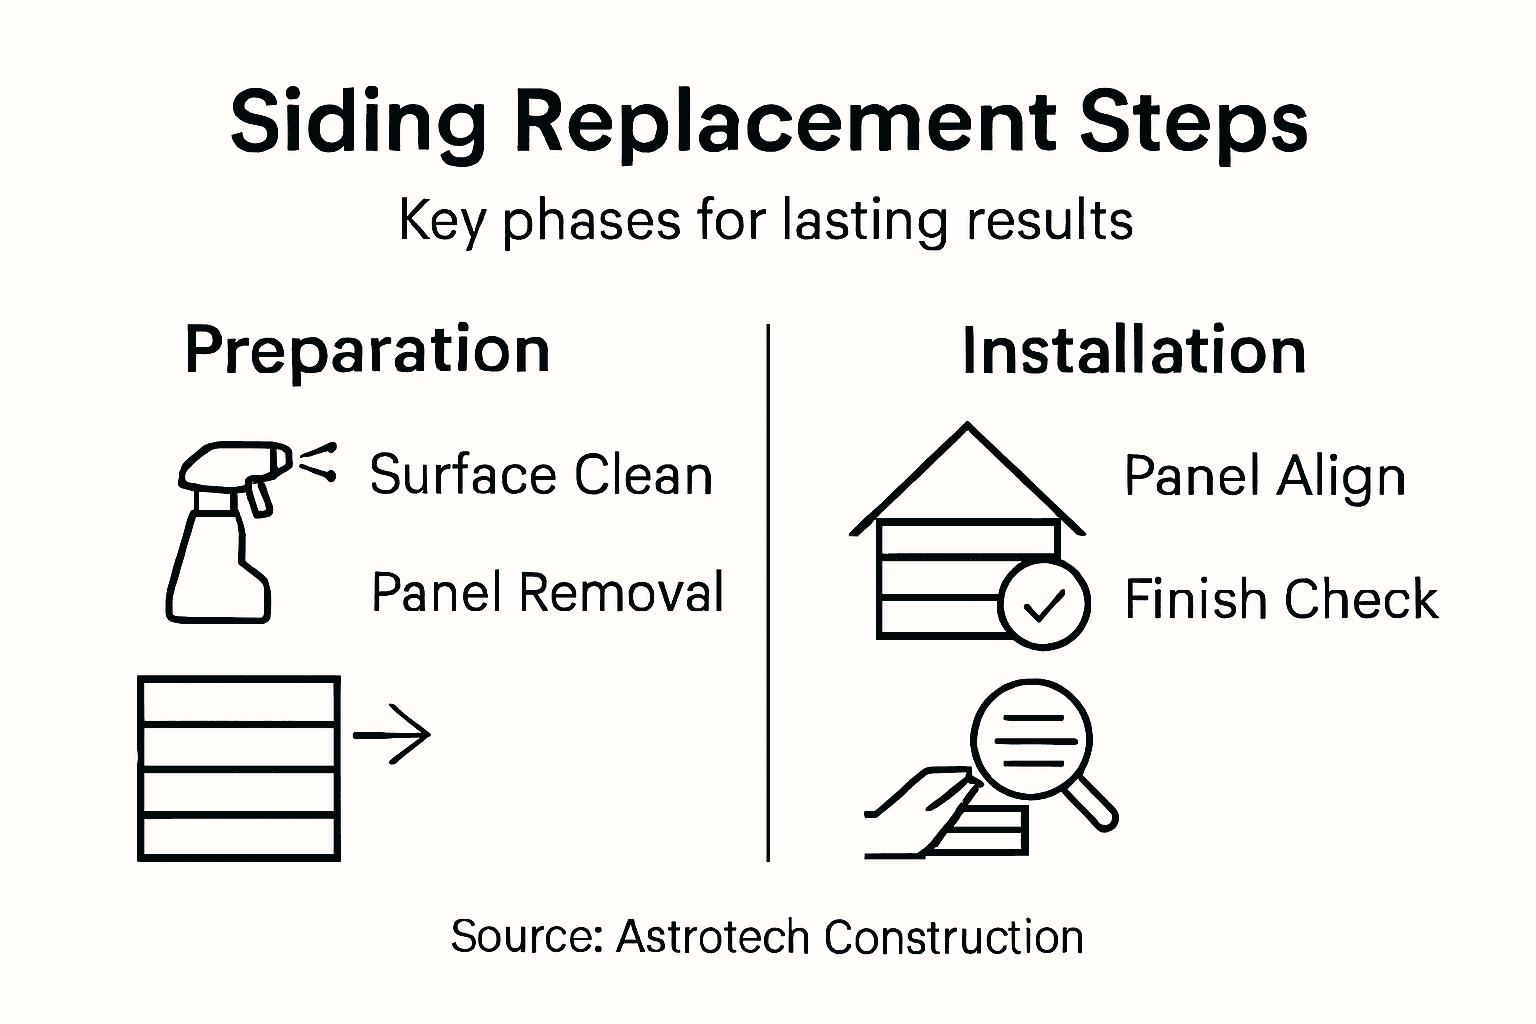
- Step 1: Prepare The Exterior Surface For Removal
- Step 2: Remove Old Or Damaged Siding Sections
- Step 3: Inspect And Repair Underlying Structures
- Step 4: Install New Siding Panels Securely
- Step 5: Verify Proper Alignment And Finish Details
Quick Summary
| Key Point | Explanation |
|---|---|
| 1. Thoroughly prepare the surface | A stable, clean foundation is crucial for siding installation, reducing moisture damage risks. |
| 2. Carefully remove old siding | Systematic removal prevents damaging underlying structures and maintains wall integrity. |
| 3. Inspect for structural damage | Check for rot or vulnerabilities beneath the siding to ensure a solid base for new panels. |
| 4. Install panels securely | Proper alignment and fastening methods will enhance durability and visual appeal of siding. |
| 5. Conduct final verification | Ensuring precise alignment and sealing gaps will optimize the siding’s long-term performance. |
Step 1: Prepare the exterior surface for removal
Removing old siding requires careful surface preparation to ensure a smooth, stable foundation for your new exterior covering. Proper preparation prevents potential moisture damage and creates an optimal base for installation. Before you begin, you’ll want to thoroughly inspect and ready your home’s exterior surfaces.
Start by conducting a comprehensive visual inspection of your current siding and underlying wall structure. Look for signs of water damage, rot, or structural issues that might compromise the new siding installation. Exterior wall preparation techniques recommend checking the sheathing and ensuring a completely watertight surface.
Your preparation process should include these critical steps:
- Remove any existing trim or decorative elements around windows and doors
- Check for and repair any damaged wall sheathing or structural wood
- Clean the entire surface thoroughly to remove dirt, debris, and loose paint
- Verify that the wall surface is level and structurally sound
- Install protective house wrap or moisture barrier if needed
Proper surface preparation is 80% of a successful siding replacement project.
Pro tip: Rent a pressure washer to clean the surface efficiently, but use a low-pressure setting to avoid damaging the underlying wall structure.
Step 2: Remove old or damaged siding sections
Removing damaged or deteriorating siding requires careful technique to prevent potential structural damage and prepare your home for a fresh exterior. The process demands precision, safety awareness, and methodical approach to ensure a clean removal that sets the stage for new siding installation.
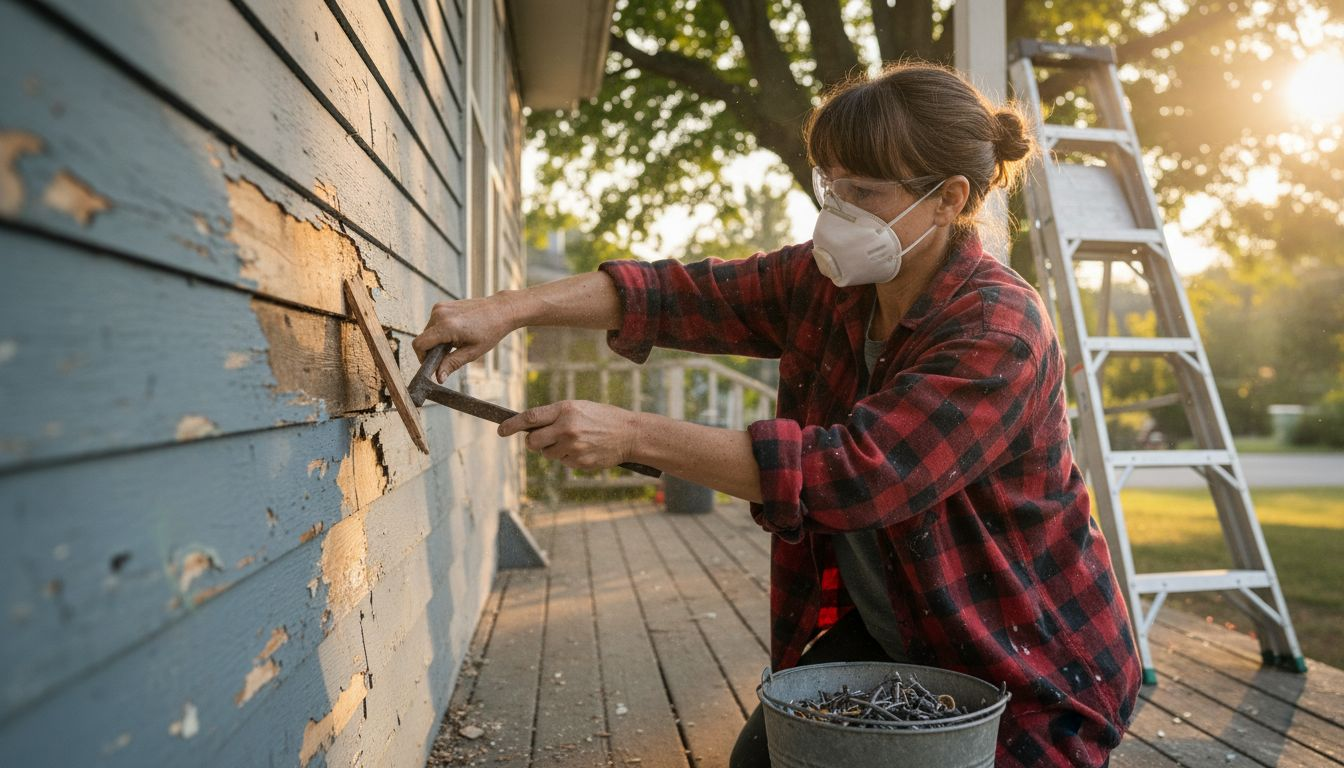
Siding removal techniques vary depending on the existing material, but the fundamental steps remain consistent. Start by gathering the necessary tools: pry bar, hammer, utility knife, protective gloves, safety glasses, and a sturdy ladder. Work systematically from top to bottom, carefully detaching siding panels to minimize damage to the underlying wall structure.
Your siding removal process should follow these critical steps:
- Inspect the entire exterior for sections that need removal
- Protect surrounding areas with drop cloths or plastic sheeting
- Remove any trim or decorative elements around the siding
- Carefully pry loose siding panels, starting from the top edge
- Work in small sections to maintain control and prevent excessive wall damage
- Inspect the underlying sheathing for any signs of rot or water damage
- Dispose of removed siding materials according to local regulations
Careful and methodical removal prevents unnecessary damage to your home’s structural integrity.
Pro tip: Wear a dust mask and protective clothing, especially when dealing with older siding that might contain hazardous materials like asbestos.
Step 3: Inspect and repair underlying structures
Before installing new siding, a comprehensive inspection of your home’s underlying structures is crucial to ensure a stable and long-lasting exterior. This critical step involves carefully examining the wall sheathing, framing, and structural components for any signs of damage, rot, or potential vulnerabilities that could compromise your new siding installation.
Structural inspection techniques require a systematic approach to identifying potential issues. Begin by thoroughly examining the exposed wall surfaces, looking for key indicators of structural damage such as:
- Soft or discolored wood indicating water damage or rot
- Visible cracks or warping in the wall sheathing
- Signs of pest infestation or wood decay
- Moisture stains or mildew growth
- Structural misalignments or uneven surfaces
When you discover damage, you’ll need to address it promptly. Repair methods will vary depending on the extent and type of damage:
- Cut out and replace rotted wood sections
- Treat exposed wood with protective sealants
- Reinforce weakened structural elements
- Address any underlying moisture issues
- Level and stabilize the wall surface
Thorough structural repairs are the foundation of a successful siding replacement project.
Pro tip: When in doubt about the extent of structural damage, consult a professional structural engineer to ensure comprehensive assessment and proper repair.
Step 4: Install new siding panels securely
Installing new siding panels is a precision task that requires careful technique and attention to detail to ensure a weatherproof, attractive exterior for your home. Your goal is to create a seamless, secure installation that protects your home while enhancing its visual appeal.
Siding installation techniques demand a systematic approach to ensure proper placement and attachment. Begin by laying out your panels with precision, ensuring each piece is aligned perfectly and ready for secure fastening. Pay close attention to critical installation details that will determine the long-term performance of your siding.
Follow these essential steps for secure siding installation:
- Verify that the underlying surface is clean, smooth, and properly prepared
- Start installation from the bottom of the wall, working upward
- Use recommended nailing techniques to allow for natural expansion and contraction
- Maintain consistent spacing between panels
- Ensure panels are level and properly aligned
- Leave slight gaps at corners and edges for material movement
- Use corrosion-resistant fasteners appropriate for your specific siding material
Proper installation is the difference between siding that lasts decades and siding that fails prematurely.
Pro tip: Always leave a small gap between panels and trim to allow for natural expansion and prevent buckling during temperature changes.
Step 5: Verify proper alignment and finish details
As you near the completion of your siding installation, the final verification process becomes critical to ensuring a professional-looking, weather-resistant exterior. This step transforms your hard work into a polished, precise home improvement project that will protect and enhance your property for years to come.
Siding alignment techniques require meticulous attention to detail and systematic checking throughout the installation process. Carefully examine each panel’s positioning, making sure horizontal lines remain perfectly straight and vertical edges align seamlessly.
Use these key verification techniques:
- Use a long carpenter’s level to check horizontal alignment
- Verify consistent spacing between panels
- Inspect all corner and edge transitions
- Check for any visible gaps or uneven surfaces
- Ensure trim pieces are correctly installed
- Confirm all fasteners are properly seated
- Seal any cut edges or potential moisture entry points
Precision in the final verification step determines the long-term performance of your siding installation.
Pro tip: Take multiple steps back and view the entire wall from different angles to catch any subtle misalignments that might be missed during close-up inspection.
Compare common types of house siding by durability, cost, and maintenance:
| Siding Material | Durability | Average Cost | Maintenance Needs |
|---|---|---|---|
| Vinyl | 20–40 years | Low to moderate | Occasional washing |
| Fiber Cement | 30–50 years | Moderate | Repainting every 10 yrs |
| Wood | 15–30 years | Moderate to high | Regular sealing/staining |
| Engineered Wood | 20–30 years | Moderate | Check for water damage |
| Metal | 40+ years | Moderate | Minimal; watch for rust |
Here’s a quick overview of each step’s primary goal and professional tip:
| Step | Main Goal | Professional Tip |
|---|---|---|
| Surface Preparation | Ensure stable, smooth foundation | Use low-pressure washer to clean safely |
| Siding Removal | Remove old panels without damage | Wear protective gear for hazardous siding |
| Structure Inspection | Identify and fix hidden problems | Consult a pro for major structural issues |
| Siding Installation | Secure, weatherproof panel setup | Leave gaps for expansion and contraction |
| Final Verification | Guarantee alignment and details | Step back to spot subtle misalignments |
Achieve Lasting Results with Expert Siding Replacement Support
Replacing siding can be challenging when faced with issues like damaged sheathing, misaligned panels, or improper installation that threatens your home’s protection and curb appeal. This article highlights key steps such as careful siding removal, thorough structural inspection, and precise installation techniques that homeowners must follow to ensure a durable, weatherproof exterior.
If you want to avoid costly mistakes and guarantee expert handling of each critical phase, trust the professionals at Astrotech Construction. Our team specializes in siding replacement with a focus on quality assurance and lasting results throughout the Dallas Fort Worth Metroplex. We understand the importance of proper surface preparation, secure fastening, and exact final verification to protect your investment.
Start your siding project the right way today by scheduling a consultation with Astrotech Construction. Visit our main site to explore how our full-service remodeling expertise ensures your home looks great and stands strong for decades. Don’t wait until minor issues turn into major repairs trust us to bring your vision to life with precision and care.
Frequently Asked Questions
How do I prepare my home’s exterior before replacing siding?
To prepare your home’s exterior, conduct a thorough visual inspection of your current siding and wall structure. Remove any trim or decorative elements, check for and repair damaged wood, clean the surface, and ensure everything is level and sound.
What are the steps to remove old siding safely?
To remove old siding safely, gather necessary tools and work from top to bottom. Inspect the exterior for sections that need removal, protect surrounding areas, and carefully pry loose panels while disposing of the materials properly.
How can I inspect underlying structures for damage before siding installation?
Inspect underlying structures by examining exposed wall surfaces for signs of water damage, pest infestation, or structural misalignments. Address any issues, such as replacing rotted wood or treating surfaces, to ensure a solid foundation for your new siding.
What are the best practices for installing new siding panels?
When installing new siding panels, start from the bottom and work upward, using recommended nailing techniques to allow for expansion. Ensure panels are level and spaced correctly, leaving slight gaps for natural movement between materials.
How do I verify that my siding installation is aligned properly?
To verify proper alignment, use a long carpenter’s level to check horizontal lines and inspect all panel transitions. Confirm that spacing is consistent and that there are no visible gaps or misalignments before finalizing the installation.
Recommended
- Siding Replacement: Protecting and Upgrading Your Home – Astrotech Construction
- What Is Siding Repair and Why It Matters – Astrotech Construction
- Effective Home Upgrade Process for Lasting Results – Astrotech Construction
- Roof Replacement Explained: Protecting Your Home – Astrotech Construction
- How to Boost Curb Appeal: Enhance Your Property’s Attractiveness – Mats4U USA